Shopify Checkout UI extensions: Validate customer data
Overview
In one of my previous blog posts, I discussed how to create a Shopify Functions using JavaScript and Javy. In this post, I will show you how to validate customer input data with client-side validation using Shopify Checkout UI extensions.
Background
I mentioned this in my previous blog post, but it is worth repeating since it is such a major change to the Shopify ecosystem. Shopify will be deprecating the checkout.liquid file and Shopify Scripts by August 13, 2024.
One of the use cases for the checkout.liquid file was to validate customer data. For example, you could use the checkout.liquid file to add javascript to validate a customer's input and display an error message if the input was invalid. Now that the checkout.liquid file is being deprecated, Shopify has introduced Checkout UI extensions as wa
In this blog post, I will show you how to validate a customer's input with client-side validation using Checkout UI extensions.
Pre-requisites
- You have a Shopify Partners account.
- You have a Shopify development store with the checkout extensibility developer preview enabled.
- You have populated your Shopify development store with some products.
Step 1: Create a new Shopify app
First, if don't already have one, we need to create a new Shopify app. So navigate to the directory where you want to create your app and run the following command:
npm init @shopify/app@latest
You will be prompted to choose a template for your app. For this tutorial, we will be using the node template, but feel free to choose whichever template you prefer. It's not important for this tutorial.
Now that you have created your app, navigate to the directory where your app is located and run the following command to run your app locally:
npm run dev
You will be prompted to use a new or existing app. If you're creating a new app, you will be asked to choose a name and development store for your app.
[Side note] I mentioned this in the pre-requisites, but make sure that the development store you choose has the checkout extensibility developer preview enabled. You can create a development store with the checkout extensibility developer preview enabled by going through the following steps:
- Go to the Shopify Partners dashboard.
- Click on 'create development store'.
- Then choose the 'Create a store to test and build' option.
- On the 'Developer Preview' dropdown, select 'Checkout Extensibility'.
- Also, select the 'Start with test data' to pre-populate your store with some products.
Check the following screenshot for reference.

For more information on creating a new Shopify app, check out the Shopify documentation.
Step 2: Add an extension to your app
Now that you have created your app, you can add an extension to your app. Make sure you are in the root directory of your app and run the following command to add an extension to your app.
npm run shopify app generate extension -- --type checkout_ui --name=my-checkout-ui-extension
You will again be prompted about what template you want to use. For this example, I used TypeScript React, but you can use whichever template you prefer.
Running this command will scaffold a new extension in your app in the extensions directory.
You can learn more about the generated files in the Shopify documentation, but for this tutorial, we will only be updating the shopify.ui.extension.toml and index.tsx files.
Step 3: Update the shopify.ui.extension.toml file
The shopify.ui.extension.toml file is where you define the extension's configuration. For this tutorial, we will be using the Checkout::DeliveryAddress::RenderBefore extension point. This extension point allows you to add content before the delivery address form.
For a full list of extension points, check out the Shopify documentation.
You also need to specify that we to use the block_progress capability. This capability allows you to block the checkout progress if the customer's input is invalid.
Here is the full shopify.ui.extension.toml file.
type = "checkout_ui_extension"
name = "my-checkout-ui-extension"

extension_points = [
  'Checkout::DeliveryAddress::RenderBefore'
]
[capabilities]
block_progress = true
Step 4: Update the index.tsx file
The index.tsx file is where you define the extension's logic.
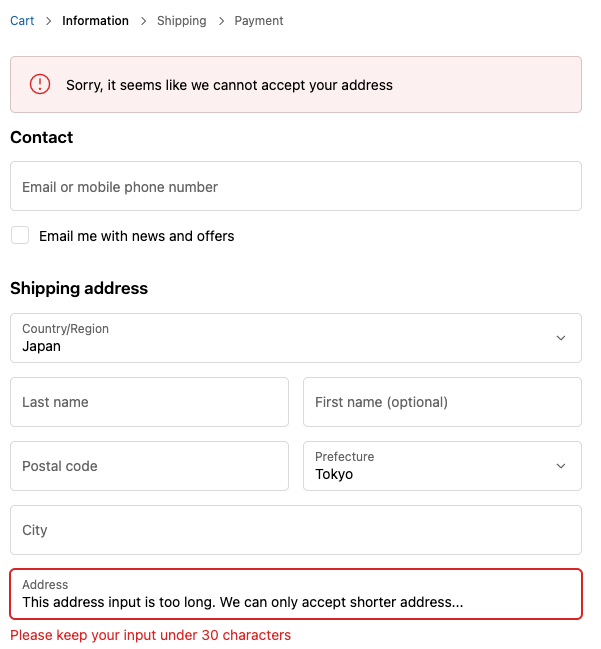
We will keep our validation logic simple for this tutorial. We will just check to see if the address1 field is over 30 characters. If it is, we will block the checkout progress and display an error message. Click here for the full list of supported targets/fields.
Note that you will need to import the render function and then specify where you want the extension to be rendered. This extension point needs to be defined in the shopify.ui.extension.toml file, which we did in the previous step.
Next we will access the customer's shipping address using the useShippingAddress hook. This hook returns the customer's shipping address.
[Side note] Requesting the customer's data like this will require a few more steps on the Shopify Partners dashboard. From the Shopify Partners dashboard, go to the 'Apps' section and click on your app. Next choose 'App setup' from the sidebar. Then scroll down to 'Protected customer data access' and click on the 'Request Access' button. You will need to request access to the customer's Address scope for this tutorial, but you can also request access to other scopes if you need them.
Finally, we will use the useBuyerJourneyIntercept hook to intercept the buyer's journey. This hook allows you to block the checkout progress and display an error message if the customer's input is invalid.
Here is the full index.tsx file.
import {
  render,
  useBuyerJourneyIntercept,
  useShippingAddress,
} from '@shopify/checkout-ui-extensions-react'

render('Checkout::DeliveryAddress::RenderBefore', () => <App />)

function App() {
  const address = useShippingAddress()

  useBuyerJourneyIntercept(({ canBlockProgress }) => {
    if (canBlockProgress && address?.address1 && address.address1.length > 30) {
      console.log(address)
      return {
        behavior: 'block',
        reason: 'Invalid shipping country',
        errors: [
          {
            message: 'Please keep your input under 30 characters',
            // Show an error underneath the country code field
            target: '$.cart.deliveryGroups[0].deliveryAddress.address1',
          },
          {
            // In addition, show an error at the page level
            message: 'Sorry, it seems like we cannot accept your address',
          },
        ],
      }
    }

    return {
      behavior: 'allow',
    }
  })

  return null
}
If all goes well, you should see something like this when you try to checkout with a shipping address that is over 30 characters.
Conclusion
That's it! You have successfully created a Shopify checkout extension that validates the customer's shipping address. I hope you found this tutorial helpful.